Materials
Assignment 12
This assignment we add a high level concept of Materials. Materials allow us to add colors to the objects in our scene. This is supposed to encapsulate the effect and some related shader uniforms in it. More about Materials is explained below. To the right is the output for the assignment. The first two spheres in the front are with an opaque effect and different colors. The other two are with a transparent effect. The pyramid and the camera can be controlled with the keyboard.

Materials
Materials are a high level graphics concept, which has a superset of functionality of an effect. With materials, we can have different materials with the same effect. Effect represents the how the object should be rendered and contains data which is mostly relevant to the Graphics internals. However, materials has data which is also used in visually represent the object. This data contains the colors the object should have and also the alpha value for transparent materials. Previously, we used to add colors via the vertices. This required colors to be changed from Maya or the human readable file everytime we needed to change the colors. Also, we would need new mesh files for new colors for different objects of the same shape. This is remedied by materials. This allows us to have a single mesh file and a single effect file but two material files for creating two objects with different colors but the same opacity and the same shape.
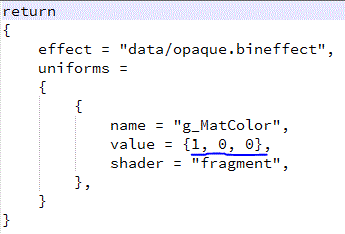
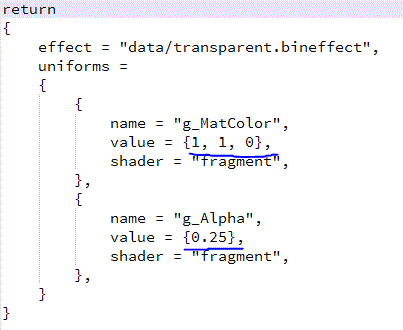
Human Readable Material
Images below show examples of human readable versions of the material file. The left one is an opaque one with red color and the right on is a transparent material with opacity of 0.25 and color yellow. The first one has only one uniform while the other has two uniforms. Each uniform is represented by a struct:
struct MatParameters
{
	float values[4];
	UniformHandle handle;
	ShaderTypes shaderType;
	uint8_t valueCount;
};
The handle is set to NULL till after the effect is loaded. Then the shaderType shows whether the uniform is in the Vertex or the Fragment shader. ValueCount tells us how many values are stored in the float array. This goes from 1 to 4 representing float, float2, float3, float4.


Binary Material
You can see a binary version in Direct3D of a material file. It represents the same transparent material with color yellow. You can see the first string as the name of the effect the material uses with null termination. Next it shows the number of uniforms contained in the file. Next 16 bytes are an array of 4 floats representing 1.0, 1.0, 0.0 . Then there are 8 bytes of handle data which is NULL (0). Next two bytes are the shadertype (02 = Fragment) and number of floats in the previous array ( 03 = RGB). After that it is trailing 6 bytes of padding because we have 26 bytes of data and in memory, it is stored as a multiple of 8 bytes (or 4 bytes in OpenGL). Then follow the similar data for the second uniform. After that are the names of the uniforms which will be used at run time to load the uniform. I have stored the strings after the uniform array, so I can directly copy the array into memory with memcpy() and the iterate through it to read each string and load the corresponding uniform without having to allocate memory for those strings.

Different Configurations
Between debug and release configurations on both platforms, the only difference is the padding data. In Debug, it is set to CC while in release it is not set to anything specific. In OpenGL, we use the data structure with 22 bytes, because the handle is an int (4 bytes) while in Direct3D it is 8 bytes (char * pointer in x64). Still you can see padding to make 22 to 24.
Direct3D Debug

Direct3D Release

OpenGL Debug

OpenGL Release

Controls
- Use the (Arrow keys) to move the camera on XZ plane.
- Use W, A, S and D to move the pyramid on the XY plane.
- Press Q and E to rotate the pyramid counter-clockwise or clockwise respectively.
- Press ESC to exit the game.
Time Estimate
Reading: 1 hour
Coding: 4 hours
Debugging: 2 hour
Writeup: 1 hour
Download Links
Download Direct3D
Download OpenGL